Expanded scale loaded voltmeters have become the accepted means of field checking your
receiver batteries to see if you can squeeze out just one more flight. The available meters at $10 to$15, are all of
the analog variety and of limited use other than for what they were intended. With the dramatic drop in price of digital
multimeters to the $20 level, many are finding their way into the R/C modelers inventory of "necessary" support
equipment. These meters have an extremely high impedance (resistance) and therefore read what is essentially the open circuit
voltage of your pack. As you all know already, or should if you have been paying attention, the open circuit voltage of a
Ni-Cd pack reveals very little regarding the state of charge of the pack. This is the very reason the expanded scale voltmeter
with its built in load is the recommend way of checking the status of your pack. Even this leaves something to be desired
as the discharge curve of ni-cds is very flat. Why not a "loaded" digital voltmeter with its inherent higher resolution?
Great idea, except no one makes such a device. Just because it isn't made has never
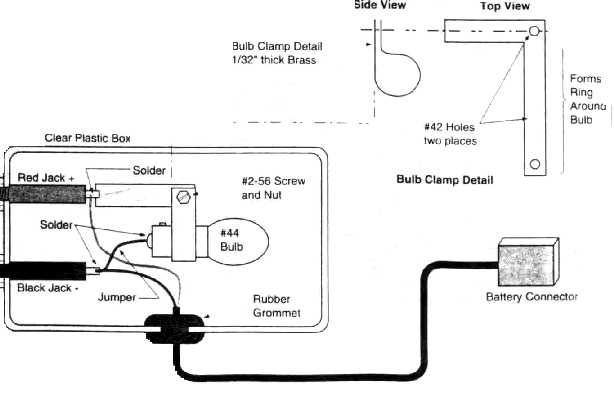
stopped a good modeler. So go to your junk box and lets turn your digital multimeter into a loaded voltmeter. You need
two pin jacks to match the leads or probes on you digital multimeter. One red for + and a black for - if you're the conventional
type. Now for a load. You could pick the right size resistor but that's kind of boring as it just lays there and resists.
A brighter idea is a light bulb. Something that clearly shows you are doing something, like loading your battery. After careful
investigation and experimenting (and rummaging in my junk box) a # 44 bulb (6.3V-250mA) was found to load the pack with 220
mA. Fairly close to the load imposed by the R/C system. If you want something a little more, either a PR12 or PR13 bulb will
give you about a .5 Amp drain. A fair pack should be able to sustain .5 amps for an hour, so you can use this gadget as a
rough capacity checker. When the bulb dims significantly you are at the end of the discharge. You will need a connector to
mate with the charge plug on/in your plane. Add to this list some kind of an enclosure to put it all in and you're ready
to assemble. I found a small plastic box about the size of a small match box that worked up into a neat compact unit. It would
be nice if the box were clear or at least translucent so you can see when and if the bulb lights as you load the battery.
Otherwise you will have to compromise the integrity of the box by adding another hole in addition to the three needed for
the jacks and battery lead. You will find that you can solder directly to the tip of the light bulb base. Attaching to the
side of the bulb base is another story as the material may not accept solder. Make up a small brass clamp with 1/32"
thick stock by 3/16" wide and secure this to the bulb with some #2 hardware, leaving a little hanging out to solder to.
Those on the crude side could use something cut out of a tin can after removing the laquer coating. If you are a really
clever tin bender you can fashion the clamp so you can solder it directly to one of the jacks providing a secure mount
for the bulb. Now all that you have to do is plug your meter into the red and black jacks and then plug your load box into
the plane's battery connector.
So what kind of a reading do you look
for on your digital loaded meter? Greater than 4.8, go for it. Less than 4.5, seriously consider packing it up and going
home. Between 4.5 and 4.8, it depends the ratio of plane value to the pleasure value of one more flight or if you have been
having a streak of bad luck lately. Some rainy day let the battery discharge through the load box until the meter reads 4.6.
Then turn on you system and do some ground checking every 5 or 10 minutes, wiggle the servos and see how long before things
start getting twitchy. This should give you a rough calibration on what meter reading you should have when you prudently call
it a day.
CLS 7/94 Rev 8-00