|
|
 |
|
|
|
|
| Click Here to Order Chargers & Access |
|
|
|
| Click Here to Order A123 Packs |
|
|
|
| Click Here for the A123 Care & Feeding FAQ |
|
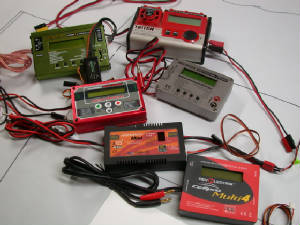
Every system setup comes with a decision chain. Here, we'll look at the various common charger, connector
and aircraft layouts and you should be able to determine after scrolling through this basic primer what you need, what to
order, and how to set it all up. Be sure and visit the A123 FAQ for technology comparisons, care and feeding notes and general LiFe support information. *
|
|
Where to start? The Charger... What you have vs. What you need. - The most basic circumstances of any equipment layout
starts with the support equipment and the requirements to check and charge the system's packs from outside the plane. Via
Basic Flight Line Darwinism we've learned that it is utterly crucial to check and observe individual cell voltage of A123
packs, we've also learned that maintaining the cell balance of the pack is critical to the 'fly - no fly' decision.
Just as we know we can't use a Turbine without the right field gear in support and so it is with A123 batteries, you
are definitely going to need an A123 compatible balancing charger and access to the pack to check the cells. - Sounds
simple enough.. unfortunately, as with most evolving new technology, the perceived needs and the equipment have changed a
bit. As of this writing we're into the fourth generation of A123 compatible chargers. - There's
an awful lot of chargers out there...
It's quite likely you already have an A123 compatible charger. Quite a few of the 'lithium capable' mutli- chemistry chargers
already have LiFe or A123 charge or balance charge support. They also have two output cable arrangements.. the banana plug
2 wire output for NiCad and NiMH packs and a molex connecting strip, aka 'balance boad', for lithium balance
charging. Some use only the balance tap on the A123 for charging. -
|
| 1st Generation Chargers Banana and Balance Outputs |
|
|
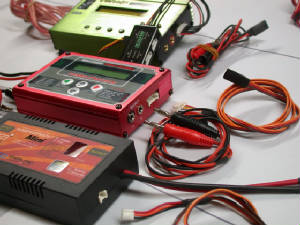
First Generation Chargers: These share a common trait... they require
either an external balancer or if equipped with an internal balancer, that balancer requires a second set of leads connected
to the pack for balance charging. The better ones we called 'Programmable Two lead Chargers'... they use a two wire lead for
fast/unbalanced charging, usually from a banana plug type output AND they have a three or more wire 'balance charge' cable,
usually a little white molex type charge socket on the side of the charger to accommodate it and/or an external adapter/balance
board. Eventually, the majority of charger MFG's adopted this 'two lead' charging format for balance charging. Most of these
early LiFe capable chargers were pretty rudimentary as far as programing algorithms and safety checks, setting up LiFe capability
usually required an 'overwrite' to the LiPo algorithm. The worst of them had no reporting ability at all (just a blinky light
for 'Done' !!) and predictably, cooked battery outcomes were fairly common. -
|
|
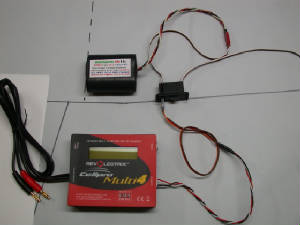
| 2nd Gen Charger.. Single cable output connector |
|
|
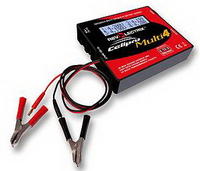
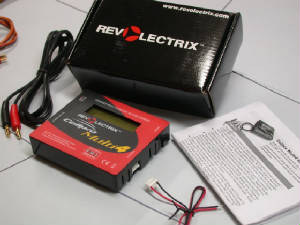
Second Generation Chargers: These are easy to spot... they have only one
output port (per pack) and it's ALWAYS a 'molex' type port. Various pack connection types are handled by the simple expedient
of adding a RC system standard charge connector to the end of the molex cable they provide to fit the little molex port
on the side of the charger. In the case of the FMA Multi-4 charger (shown) we make packs available with the matching
balance tap plug built on them to connect directly to the charger... but with A123 packs (and with giant scale airplanes)
pulling the pack out of the plane to make it accessible to the balance charger can be a mite problematic. We sell the charger
pictured WITH an adapter cable that will allow you to plug directly into our A123/LithiumWerks 6.6v packs .. either to the
packs JR/Univ balance lead & then via a small dedicated seperate charge port or, via our unique 20g three wire Combo power
feed equipped pack thru a 'Combo Chargeport Switch'.. We'll show you two ways to get that done in the 'Switches' discussion further
down the page. - |
|
| 3rd Gen Charger.. Single Output, Bal & Power Port |
|
|
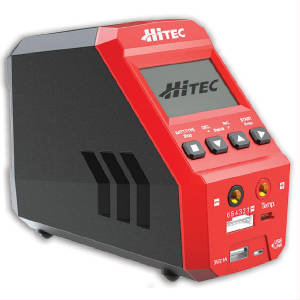
Third Generation Chargers: Single Pack/Dual Connection Smart Chargers.
The majority of these RC specialized multi-chemistry chargers are set up with this connection format; Banana ports for + &
- connection to the packs separate power feed AND a 'molex' 4S or 6S JST-XH format balance board port for connection to the
packs separate balance lead.. In order to balance charge or display or engage the chargers overcharge and auto cell count
& crucial safety features BOTH the banana port and JST/XH port connector cables need to be connected to the A123/LiFe
pack. These chargers are quite competent in dealing with field checking, fast field charging and reporting charge status if
both connections to the pack are made... however, getting both those connections made to the pack while the the pack is in
the plane can be problematic... two complete cable setups must be run from the charger to each pack every time
you need to charge or check the status of that pack. No Worries, tho.. we've whupped this issue, making access
to the pack with third and 4th generation chargers a 'single cable no-brainer' with our Combo Charger Cable. More on that
below, read on... - |
|
| 4th Gen Charger.. Multi Outputs, Bal & Power Port |
|
|
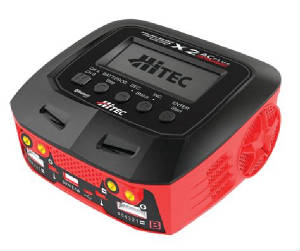
Fourth Generation Chargers: Expanded Multiple Pack/Dual Connection Smart
Chargers. These pretty much retain the format connectivity of all the previous 'two lead' balance chargers but have added
PC or SmartPhone connectivity and added some features advantageous for larger LiPoly Electric Flight Motor packs. As with
all the previous iterations, in order to balance charge or display or engage the chargers overcharge and auto cell count &
crucial safety features BOTH the banana port and JST/XH port connector cables need to be connected to the A123/LiFe pack.
These chargers are quite competent in dealing with field checking, fast field charging and reporting charge status if both
connections to the pack are made... however they retain the same connectivity issues in getting both those connections made
to the pack while the the pack is in the plane. Two complete cable setups must be run from the charger to each pack every
time you need to charge or check the status of that pack. No Worries, tho.. we've whupped this issue, making
access to the pack with third and 4th generation chargers a 'single cable no-brainer' with our Combo Charger Cable. More on
that below, read on... - |
|
|
Now, there's several routes your decision chain can take.. and again; before we can decide what pack connector configuration you
need we have to decide how your going to set up power delivery from the pack to the radio and servos and how we're going to
give the balance features of your particular charger type acess to charging the pack. -
|
|
Comparative Advantages between Chargers: While the two cable connection types
get the job done, the big difference amounts to the ease of connecting up an A123 pack for charging in the plane. With a 'two
cable charger' a second charge port is normally required.. as well as a seperate 'tap' on the pack to connect it to in addition
to the usual system connector to the switch. This means the Rx pack will have two connectors... one prime feed to the switch
and off to the Rx and servos.. the other for balance charging. With some 'generation 1 chargers' that meant you needed 2
connections to every pack being balance charged and as a result, 2 charge ports on the side of the plane for field charging
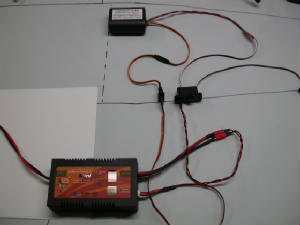
each pack. Below are some examples of what a 'standard' two cable balance charging connection looked like, alongside a single
cable charging setup to the right. -
|
| 1st Gen Typical 2 Cable Balance Charging |
|
| Note the 'Ernst' type seperate charge port |
|
| 2nd Gen Typical 1 Cable Balance Charge Setup |
|
| No second charge port Req.. and Single lead on pack! |
|
Generation 2 chargers require only one connection to the pack.. and with a simple modification to your existing HD Chargeport
switch (we'll cover that in the Switches section) will allow balance charging through the switch chargeport... without
any other holes in your plane. Fear not.. if you have a 1st generation two cable charger, there is also a solution
for that, we'll also cover that below.
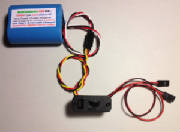
The Old 'Standard' Two Cable Setup with Separate Celltap
|
| Typical Balance Charge Connection Layout |
|
| Click Picture for Full Size |
|
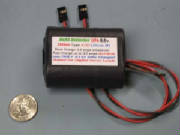
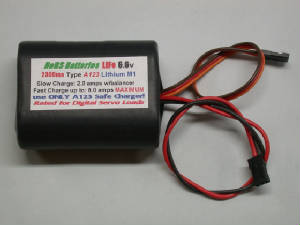
| A123 2300 6.6v 'standard' pack |
|
| 18g JR/Univ 2 wire power feed, 22g 3 wire JR/Univ balance tap |
|
So... here on the left is an 'old school' Standard
A123 Connection setup. Note that the packs 3 wire JR/Univ celltap meets a 6" std aileron extension that plugs into a
Univ Ernst type chargeport. This allows access from outside the plane to balance charge the pack with a simple Univ Celltap
to Charger Cable. This can't be done (access from outside the plane) with a JST/XH, FMA or ThunderPower, etc, type molex celltap
on the pack.. A suitable molex (JST/XH, FMA, TP, etc) to JR/Univ straight adapter cable must be used to connect between a
RC standard connection (JR/FJ Univ type) installed in an extra chargeport and the two lead chargers balance port or balance
board. You'll note the usual 'chargeport' type switch is then plugged in to the packs 18g two wire power feed. To complete
the charge hookup for the 'standard' configuration you now need a standard banana plug to FJ/JR charge cable to get from
the switch chargeport to the charger's banana output ports. While this setup is a bit cumbersome, it works fine and is commonly
used with 'power expander' boards for very high current drain systems using Deans, EC3, XT60 or Multiplex connectors on the
output side of the switch to connect to the expander board, or; Deans, EC3, etc w/16g leads on the packs power feed if Rx
switching was being done by a 'captive' power switch controlling the power expander and the pack puts power to the board directly.
(IMAC/3rd Scale, etc) When FMA's second generation chargers arrived on the scene, a second cable connection wasn't required.
The FMA chargers adapter cable was plugged into the accessory or second charge port and the pack was handled via that connection
alone. More convenient.. but we still had two holes in the plane per pack and two leads on the pack to boot. |
The Common Battery Pack Connector Choices We set up packs with a pretty confusing array of connectors. To clear up some confusion and make it
easier to visualise whats going on with the switch and tap layouts peculiar to A123's, here's some pics of the most common
configurations for A123 packs.. NOTE: Plugging our packs JR/Univ balance connector directly into
a balance charger or it's balance board can damage your charger or the pack... the pin positions in the JR/Univ housing are
not compatible on their own with the pin positions in your charger's molex balance port. You'll need a JST/XH or FMA to JR/Univ
adapter to make the connection from your planes chargeport to your balance charger; they are available on the A123 packs page.
See the A123 FAQ for more details
|
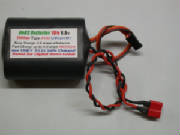
| A123 2500 w/ Single 3 Wire 20g Combo Univ Conn |
|
|
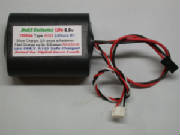
| A123 2500 with Univ Celltap and Standard 18g JR/FJ |

|
|
| A123 2500 w/ Univ Celltap and 18g Deans, EC3, etc |
|
|
| A123 2500 with Custom Configured Tap & Power Feeds |
|
|
Don't see what you're looking for here? All of our
A123 Rx, Ignition & Turbine packs and A123 Accessories, including the A123 rated switches discussed below are available
on our A123 Packs page. Just click the link in the navbar on the left of the page. Scroll down for A123 Rated switches &
Charger cables. Near the bottom of this page, you'll find some package deals.. read on and profit! -
On the far left, our 2500 A123 w/ the 'Combo 20g
Three wire JR/Univ Combined Power & Balance' connector.. the simplest A123 setup when combined with our 'Combo Switch'.
. The center two packs, from left to right, are shown above with connector setups that can also easily permit balance
charging in the aircraft via a separate 'ernst' type universal charge port & will permit single cable balance charging
with the appropriate 'Combo Charger Cable' or adapter specific to your charger. The pack above on the far right is shown
set up with either an FMA or JST/XH 2S balance tap and is shown as a comparative example of a connector configuration that
nominally requires you to remove the pack from the plane to balance charge or check individual cells... appropriate for LiPoly
types since they nominally require removal of the pack from the plane for balance or fast charging and individual cell voltage
checks.
|
|
The Switches and Chargeports - Every RC application requires some way to isolate the battery from the Rx and servos when not in use
or being charged. The key common components to accommodate that are a switch and a chargeport. Below left, a Univ Chargeport, below
center, HD after-market system switches as commonly used in Giant Scale Applications and, on the right, our own custom made
Combo Switch for A123. Now, lets see how we put 'em to use with the various charger types, pack cabling choices and connectors
most often used in Giant Scale.
*Leveling
the Playing Field - Upgrading your 1st, 3rd & 4th Generation 2 cable charger to Single Cable compatability
|
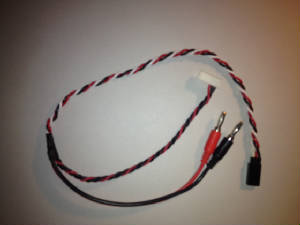
| NoBS A123 Combo Solution Charger Cable |
|
| $24.95 |
THE COMBO
SOLUTION CHARGER CABLE Up until recently, if you
had a 2 cable 1st, 3rd or 4th generation balance charger you were pretty much committed to two holes in the plane for
each pack to check cell voltages and two cables from the charger to the pack to balance charge as well as two leads on the
pack to make it all work.. Some work-arounds involved just doing unbalanced charging at the field and balance charging 'occasionaly'..
suitable for R/C trucks and park flyer foamies, not suitable for a 30 pound Warbird worth about 500 toy trucks and
flying burger wrappers. We need to be able to get the charger's balancer, reporting and saftey features in play on
every charge and to do that we need a three wire connection to the pack. Enter the NoBS A123 Combo Solution Cable. It's a
single cable charger cord that combines the functions of both the output ports on your charger. It's set up with banana plugs
for connection to your chargers main power output AND a spliced-in JST-XH balance board/balance port connector on the charger
side that mates with 90% of the balancing chargers currently in use. On the pack side, it's finished with a FJ/JR-univ charger
plug that will fit any R/C standard switch chargeport. It's a comfortable 18" long; the output section is made out
of HD twisted 20g cabling that matches our Packs (not 22 or 26g cabling like our copycats) and it can handle a full 2-3 amps
continuous charge rate. Need it longer? It can be instantly extended with a 20g aileron extension. AND, of course, you
get the full benefit of using your chargers balancer, reporting & saftey features every time you cable up to charge at
the field, all through the switch's chargeport. That's right.. no separate chargeport on the plane required. Read on, and
we'll show you how!
|
*Basic
Combo Solution Switch Mod for Single Lead Balance Charging Q: I've got 22g type standard three
wire in, three wire out 'chargeport' switches. Can I use them with your A123/LiFe packs or do I need to buy your 'Combo' switches?
A: Our 'Combo Switch' has a few advantages over standard chargeport switches... where your
switch is all 22g in and out w/JR/Univ or FJ connectors, our Combo Switch is set up with 20g three wire twisted in, and even
heavier18g two wire out... perfect for most high demand, high current load projects, AND you can get the Combo Switch configured
with Deans, EC3,XT60 or Multiplex outputs! However, If you've got an existing sport
or scale project with Nicads or NiMH packs in it and it's set up with 22g three wire in & out cabled JR/Univ or FJ switches,
here's where we show you how to take advantage of those existing chargeport switches with our Combo Cabled A123 packs. With
the mod shown below and a Combo Solution Charge Cable... and, you've got most
any of the A123 capable balance chargers out there.. you'll be good to go with no muss and little fuss.. and no extra holes
in the plane. Same goes for you owners of FMA's single lead chargers supplied with our FMA to JR/Univ adapter cable.. do the
switch mod shown below and you are good to go with A123's . The idea is to set up an A123 system without a separate Univ
Chargeport on the plane or separate cell balance tap on the pack. With a quick modification, a standard HD Chargeport switch
can be bent to the task. Notes on Binding with Modifed Switches: Most all HD chargeport switches are set up with three wire
feeds to the RX, the original intent was to enable the 'DSC' feature available on top end 72 MHz Tx's. 'DSC means 'direct
servo connection'.. it gave you a means to power up and actuate the Rx and servos on the plane without actually 'transmitting'.
Early on, this switch feature also enabled 're-binding' via the switch chargeport on some 1st generation 2.4 systems that
would lose 'bind' fairly often. In a world filling rapidly with significantly more reliable 2.4 GHz radio systems the DSC
feature is not often (if ever) required for binding and 2.4GHz Rx ‘re-binding’ in the plane is not handled
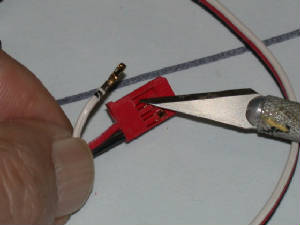
via a switch chargeport. In any case, most HD switches are equipped with that
'third' output wire to the Rx.. it's a 'signal' lead and we need to remove it from the plug that goes into the Rx so we don't
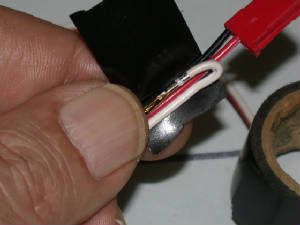
put power to the Rx on that lead. To remove it you need a razor knife and a bit of electrical tape. With this mod, we're going
to turn your switches 3 wire Rx power feed into a 2 wire power feed. Check the photos below..
|
| Lift contact retainer tab, slide out contact |
|
| Click Picture for Full Size |
|
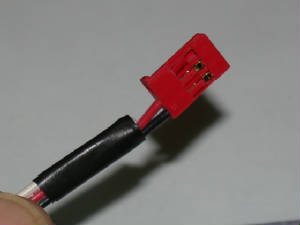
| Fold back contact, tape to insulate |
|
| Click Picture for Full Size |
|
| Done, ready to plug into Rx |
|
| Click Picture for Full Size |
|
Ok, Now your HD chargeport switch is ready for use with
a NoBS A123 pack with a single HD 3 wire combo feed. No Univ Chargeport required.. just use the switches chargeport with
a single connection to your Generation 2 charger. If your considering switching to A123 Rx packs in an existing project,
you don't yet have an A123 charger and you want to use your existing switches.. this is how it's done. Note that failing
to pull that signal feed wire to the Rx from that plug will likely damage your Rx.. so don't attempt this without first
modifying that plug. On the plus side.. no extra holes and extensions in the plane and the A123's along with a 2nd
Generation charger like the FMA Multi-4 make this an exceptionally easy, neat and clean setup in any aircraft with any pack
configuration... parallel, single or ignition. Just pull the 'signal' feed to the Rx from the switch, drop in the A123's,
hook up a Combo Solution Charge Cord or standard JR/Univ to FMA adapter to your charger and you are good to go for balance
and fast charging, all through the switch chargeport!
|
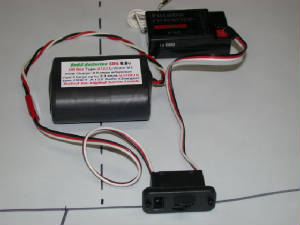
| Pack w/ Combo Connector & HD Chargeport Switch |
|
|
Q: I like this.. what do I order, what connectors should be on the pack? -
You need an NoBS A123 Combo Solution Charge Cable if you have a two cable balance charger or an FMA to Univ
adapter cable for FMA Cellpro or Multi 4 chargers. The pack should be ordered with NO
balance tap and WITH the '20g 3 Wire Combo Univ' for the pack feed.
Be sure and read thru our A123 FAQ for important info on balance charging!
|
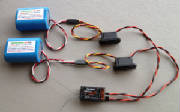
Simple Parallel Pack Systems - A 'Best Pick'
for Agressive High Drain 3D Applications Most folks that use parallel setups
can instantly take advantage of the layout shown to double the flying capacity and vastly improve redundancy. Just use
two packs with our Combo 20g power feed as shown above, and a pair of our Custom Combo Ultraswitches w/ 18g JR output (or
mod your own three wire switches) and you are good to go.. simplest, cleanest setup possible for a fully redundant parallel
pack and switch system. All the benefits of the single pack, single connector system, times two. Nothing could be easier.
Concerned about running without a 'battery backer' or an isolation curcuit? Click on this text for a refreshing bit of common sense advice regarding simple parallel systems.
*A123
Rated Single Pack, Single Switch, Dual Rx Feed Setups These are
very popular setups for aggressive 3D flyers and it's also a handy way to improve current handling ability without a
second switch or pack. Both the switches below can deal with high current drain and can handler up to 4 amp charge rates,
right through the switch chargeports with the Combo Solution Charger Cables.
* This is our new HD Combo Solution UltraSwitch developed
exclusively for us here at NoBS for our A123 packs set up with a single Combo 20g three wire power feed. The switch has a
20g single three wire twisted input, an exact match for the heavy duty 20g three wire feed on our packs. Eliminates the
need for a separate input for a balance lead. Like the Nano Switch above, it has dual outputs to the Rx, outstanding
for spreading out digital servo current loads common with Giant Scale Aerobatic routines. It's also avaiable with a single
18G JR/univ output, making it perfect for use with ignition modules or parrallel pack/parallel switch setups. Neater still,
and built by ElectroDynamics exclusively for us. - Pack Cabling Requirements: NO Balance connector and
one Combo 20g three wire twisted power feed. That's it!
|
| NoBS A123 Combo Switch & Pack |
|
| Combo Solution Switch: just $24.95 |
|
|
Power Boards and 'Soft' Switches There's more than a few folks out there with really BIG setups, using power expanders, soft switches
and a host of current distribution devices intended to deal with massive current loading outside the capapbilities of your
average R/C system standard connector set. We've got you covered too. Most of you use either Deans, EC3 or Multiplex connectors
and heavy 16 or 14g power wire to deliver current to the power distribution system. For you folks, you'd use
the 'Standard' pack cabling (that's WITH a seperate JR/Univ balance lead on the pack) system and install a seperate charge
port to get access to the packs for balancing and checking via that lead. We have the packs with Deans, EC3 or Multiplex and
will set the leads up for whatever lengths and guage you need, just vist our A123 packs page to order.
|
| A123 2300 w/ Univ Celltap and Deans, EC3, etc |
|
|
Conclusion That pretty much covers system setup basics for A123's. Up at the top of the page are links for our
A123 Packs, A123 Care and Feeding FAQ and for our Chargers and Accessories page. Our A123 packs page also has A123 rated switches,
cables and accessories, just scroll down a bit. If you found this info useful.. tell your friends and link the site. I don't
do any formal advertising.. this little company runs on word of mouth and on satisfied repeat customers. I hugely appreciate
your business! Hope all this helps! Steve
Anthony, NoBS Batteries 10/14/2009, updated 12/18/2019
* A123 Combo Switches, Combo Charger Cable and Package
Deals for 6.6v 1100 & 2500 Series Packs
|
|
The 'Combo' Switch for our 6.6v A123
Rx & Ignition Packs.. It's
a Heavy Duty ED UltraSwitch II body modified for use with our A123 packs, matching and mating with the single 20g three wire
Combo Balance & Power feed output of our packs. We've ungraded the 'stock' 22g cabling to 20g on the input side and it's
now available with either DUAL 22g JR/Univ outputs or with a 12" 18g single output finished with your choice of system
connector. FJ, JR/Univ, Deans, EC3, Multiplex, Anderson Connectors.. use it for Ignition Modules or with any System Rx. Plus,
its compatible with most Power Expanders. Makes A123 conversion and Set-Up simple, efficient and easy. Use our Combo Charger
Cable (right->) to BALANCE CHARGE and CHECK your packs cell balance and charge status THRU
THE SWITCH CHARGEPORT! No second lead required on the pack, no separate chargeport required on the plane.
Immensely simplifies pre-flight checks and on field charging if required. When combined with our Combo Charger Cable you'll
be set up for 'Single Cable' field charging with almost any conventional two cable balance charger! $28.95
 |
The 'Combo' Charger Cord for our 6.6v
A123 Rx & Ignition Packs.. Here's
all you need to convert pretty much ANY two-cable A123/LiFe charger that requires two connections (banana plug and JST-XH
ports) at the charger to balance charge &/or check individual cell voltage. The Combo Charger Cord terminates in
a single 20g three wire JR/Univ Female connector... ready to plug into your switch chargeport so you can check individual
cell voltages and balance charge at the field EASILY via your switch chargeport. Overall length is 18-20" so it'll
easily reach from the field charger to the switchports on the fuselage. Exceptionally useful.. it's also the preferred adaptive
Charger Cord for cabling directly from the charger to the JR/Univ 22g balance connector that's standard on all our 'Conventionally
Cabled' packs equipped with the separate JR/Univ balance connector.. even if the pack has a separate balance charge lead,
you'll still have an uncomplicated single charge lead/connection to the pack for either balance or field charging via a separate
charge port! $24.95
|
A123 Rx /Ign Pack Package Deal, 6.6v 1100
Series 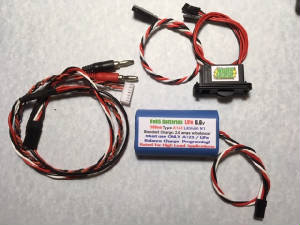
The 'Combo' Packages... 1100 Pack, Switch
and Charger Cable Deals Combine the 1100 pack above with either -OR- both the Combo Switch and the Combo Charger Cord and
SAVE! A123 1100 6.6v Pack & Combo Switch; Reg $68.90
(The On-Board Deal).. just $64.95* Above Pack, Switch & Combo Charger Cable; Reg $93.85 (The Starter Deal).. just $84.95* * custom switch outputs add'l $ 1100 Series Package Deal:
|
A123 Rx /Ign Pack Package Deal, 6.6v 2500
Series 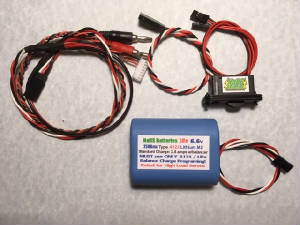
The 'Combo' Packages... 2500 Pack, Switch
and Charger Cable Deals Combine the 2500 pack above with either -OR- both the Combo Switch and the Combo Charger Cord and
SAVE! A123 2500 6.6v Pack & Combo Switch; Reg $83.90
(The On-Board Deal).. just $79.95* Above Pack, Switch & Combo Charger Cable; Reg $108.85 (The Starter Deal).. just $99.95* * custom switch outputs add'l $ 2500 Series Package Deal:
|
|
|
|
*A123 & Nanophosphate are trademarks of A123 Racing, Inc. All A123 cells and chargers assembled
and distributed by Hangtimes Hobbies and NoBS Batteries are acquired from A123's sole licensed US Distributor. All rights
to A123 technology and trademarks reserved by A123 Racing Inc. ED, Nano and Nano Ultra Switch are trademarked products of
ElectroDynamics Inc. FMA and FMA Multi-4 are tradmarked products of FMA Incorporated.
Hangtimes Hobbies NoBS Batteries
|
|
|
|